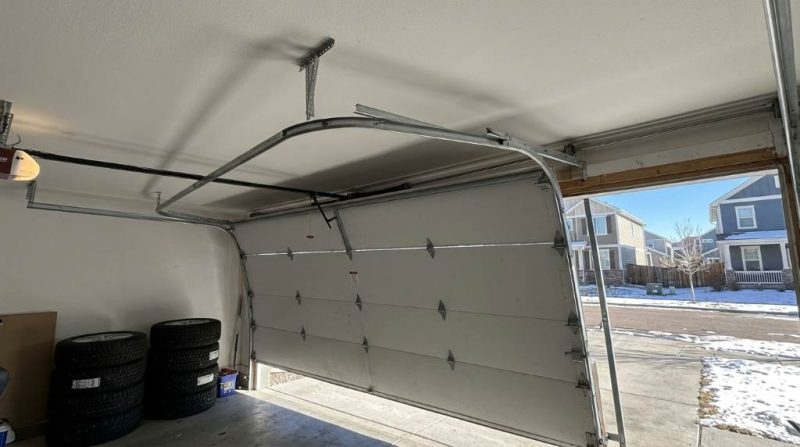
The kitchen is the heart of every home, where meals spark joy and memories are made. Growing up, I watched my grandmother effortlessly whip up feasts with just a stove and a trusty mixer. Today, home appliances have transformed cooking, making it faster and more fun. Whether you’re a busy parent or a culinary enthusiast, having the right kitchen appliances can simplify tasks and boost efficiency. From blenders to smart ovens, these tools are game-changers. According to a 2023 Statista report, 78% of households rely on modern appliances for daily cooking. This guide shares must-have home appliances, weaving in personal stories and expert insights to help you create a dream kitchen.Continue reading →
5 Home Improvement Tips That Will Transform Your Living Room
The living room: it’s the heart of your home, a sanctuary for relaxation, a hub for entertaining, and a reflection of your personal style. But what happens when this central space starts to feel a little lackluster, a bit dated, or simply no longer serves your needs? It’s time for a transformation! Embarking on a living room overhaul doesn’t necessarily mean breaking the bank or undertaking a massive renovation. With a few strategic improvements, you can breathe new life into your space, significantly enhancing its aesthetic appeal and functionality.
This article will guide you through five impactful home improvement tips designed to metamorphose your living room into a stylish, comfortable, and inviting haven that you’ll love spending time in for years to come. Prepare to be inspired and get ready to unlock the hidden potential of your living space, creating an environment that truly feels like home.Continue reading →
The Uninvited Guest: How to Banish Pink Mold from Your Shower for Good
That unsightly pinkish, slimy film that appears in your shower isn’t just an aesthetic nuisance; it’s a sign of a thriving microbial colony. Often mistaken for a type of mold, this pervasive pink residue is actually a bacterium known as Serratia marcescens. While typically less dangerous than black mold, its presence signals an environment ripe for microbial growth, and for certain individuals, it can pose legitimate health concerns.
In this comprehensive guide, we’ll delve deep into understanding what pink mold is, why your shower seems to be its favorite hangout spot, the potential health risks it carries, and, most importantly, a robust arsenal of prevention strategies to keep your shower sparkling clean and mold-free for the long term.Continue reading →
The Flicker Files: Why Your Light Bulb is Playing Disco and How to Fix It
There’s nothing quite as jarring as flipping a light switch, expecting a comforting glow, and instead being met with a maddening strobe effect. That intermittent flicker isn’t just annoying; it can be a tell-tale sign of underlying electrical issues, ranging from the mundane to the potentially serious. If your light bulbs are suddenly performing a dazzling, unwanted light show every time you turn them on, you’re not alone. This comprehensive guide will delve into the myriad reasons behind this common household headache and equip you with the knowledge to diagnose and, in many cases, resolve the problem.Continue reading →
How to Clean a Car’s Interior Roof – Step-by-Step Guide
The interior roof of your car, also known as the headliner, can accumulate dust, stains, and odors over time. Whether it’s from cigarette smoke, food spills, or general wear and tear, a dirty headliner can make your car’s interior look and smell unpleasant. Cleaning it properly requires gentle handling to avoid damaging the fabric or glue underneath.
In this guide, we’ll walk you through how to clean your car’s interior roof step by step using different methods based on the level of dirt and stains.
Step-by-Step Guide
Step 1: Gather Your Cleaning Supplies
Before you start, gather the right materials to avoid damaging your headliner.
What You’ll Need:
Microfiber cloths – Soft and lint-free to prevent damage
Soft-bristle brush – For light scrubbing
Vacuum cleaner with a brush attachment – To remove loose dirt
Mild upholstery cleaner or fabric cleaner – For general cleaning
Foam cleaner – For deeper stains
White vinegar & water mixture – A natural alternative for stains and odors
Baking soda – Helps eliminate bad smells
Step 2: Vacuum the Headliner
Why vacuum? This removes loose dirt, dust, and debris before applying any liquid cleaner.
Attach a soft brush to your vacuum.
Gently vacuum the headliner using light strokes.
Avoid pressing too hard to prevent damage.
Tip: If your vacuum has a weak suction setting, use it to prevent pulling on the fabric.
Step 3: Light Cleaning for General Dirt & Dust
If your car’s roof is only slightly dirty, a simple wipe-down should do the trick.
Dampen a microfiber cloth with a small amount of upholstery cleaner or mild soapy water.
Lightly wipe the fabric in a circular motion.
Use a dry microfiber cloth to blot away moisture.
Tip: Avoid soaking the headliner—too much moisture can weaken the glue holding it in place!
Step 4: Spot Cleaning for Stains
For minor stains like food spills or fingerprints, follow these steps:
Spray a small amount of foam cleaner or upholstery cleaner on the stain.
Let it sit for 30–60 seconds to break down the dirt.
Use a soft-bristle brush to gently scrub the stain in circular motions.
Blot with a clean, dry microfiber cloth to absorb moisture.
Alternative:
For greasy stains: Mix equal parts white vinegar and water, apply lightly, and blot dry.
For coffee stains: Use a mild dish soap and water mixture.
Step 5: Deep Cleaning for Strong Odors & Tough Stains
If your car’s roof smells bad (smoke, mildew, pet odor), a deep clean is needed.
Option 1: Baking Soda Deodorizing
Lightly sprinkle baking soda over the headliner.
Let it sit for 1–2 hours to absorb odors.
Vacuum it off gently.
Option 2: Steam Cleaning (For Severe Stains)
If stains persist, use a handheld steam cleaner with a fabric attachment.
Move it across the surface without soaking the fabric.
Blot excess moisture with a microfiber cloth.
Tip: Never oversaturate the headliner, or the glue underneath may loosen, causing sagging.
Step 6: Let It Dry & Prevent Future Stains
Leave car doors/windows open for 30–60 minutes to allow airflow.
Avoid touching the roof until fully dry.
Use fabric protectant spray to prevent future stains.
Final Tips for Keeping Your Car’s Roof Clean
Vacuum regularly to prevent dust buildup.
Avoid smoking inside the car to prevent odor stains.
Clean spills immediately to stop them from setting in.
Use an air freshener or baking soda to maintain a fresh smell.
By following these steps, your car’s headliner will stay clean, fresh, and in good condition for years!
FAQs
Can I use a regular household cleaner on my car’s headliner?
No, harsh household cleaners can damage the fabric and adhesive. Use a mild upholstery cleaner or a foam-based fabric cleaner instead.
How do I remove cigarette smoke smell from my car’s roof?
Sprinkle baking soda on the headliner, let it sit for a few hours, then vacuum it off. You can also lightly mist a vinegar-water solution to neutralize odors.
Will too much water damage my car’s headliner?
Yes! Excess moisture can loosen the glue, causing sagging or peeling. Always use minimal liquid and blot dry immediately.
Final Thought
Keeping your car’s interior roof clean enhances its appearance, eliminates odors, and maintains its value. Regular vacuuming, gentle spot cleaning, and deodorizing with natural solutions like baking soda can prevent stains and buildup. Avoid excessive moisture to protect the adhesive and fabric integrity. With the right care, your headliner will stay fresh and spotless for years. A clean car interior not only looks great but also creates a more comfortable driving experience. Stay proactive, and your car will thank you!
How to Build a Minecraft Roof: A Step-by-Step Guide
Building a roof in Minecraft can seem like a daunting task, especially if you’re aiming for a stylish, functional design that complements your structure. A well-crafted roof not only improves the aesthetic of your home or building but also helps protect it from external elements (like rain) within the game’s mechanics. Whether you’re working on a small cottage or a grand castle, there are several techniques to create the perfect roof in Minecraft. This guide will walk you through the steps to build a variety of roofs that will enhance your build’s overall look.
Why is the Roof Important in Minecraft?
In Minecraft, roofs serve multiple purposes:
Protection: While rain doesn’t impact gameplay mechanics significantly, a roof adds a realistic touch and protects your home from mobs spawning inside.
Aesthetic Appeal: A well-designed roof can make even the most basic structure look impressive. Minecraft is all about creativity, and the roof is one of the most visible parts of your build.
Functionality: The roof provides a safe, enclosed space and is often integrated with windows, lighting, and other functional elements.
Materials You Can Use for Roofs
Before you start building, it’s important to consider the materials you’ll use for your roof. Minecraft offers a variety of materials that each contribute different aesthetics and functionality:
Wooden Planks (Oak, Birch, Spruce, etc.) – These materials are commonly used for cozy, rustic roofs.
Stone Slabs and Blocks – Ideal for more sturdy, medieval, or industrial-style roofs.
Bricks – Great for a more formal or classic architectural look.
Cobblestone – Offers a rough, sturdy look, suitable for a more rustic or primitive style.
Glass Panes – These can be used for skylights or modern-style roofs.
Slabs – These are key to creating angled roofs and sloped designs.
Step-by-Step Guide to Building a Simple Roof in Minecraft
Planning Your Roof Design
First, determine the shape and style of your roof. Common roof styles in Minecraft include:
Flat Roof: Simple and straightforward, often used for modern or minimalist builds.
Pitched Roof: The most common type of sloped roof, ideal for traditional and fantasy-style houses.
A-Frame Roof: A steep, symmetrical triangle, often used in mountain houses or cabins.
Mansard Roof: A more complex roof design with multiple slopes and a steeper top section, often used for more elaborate builds.
Building a Simple Sloped Roof (Pitched Roof)
For a basic pitched roof, you’ll be using stairs and slabs to create an angled effect. Here’s a simple guide for a basic sloped roof using wooden planks or any material you prefer.
Materials:
- Wooden Planks or any material of your choice.
- Stairs (matching your roof material).
- Slabs (optional, for a finer slope).
Steps:
Step 1: Start by placing a flat row of blocks along the top edge of your house. This will form the base of your roof.
Step 2: Next, place stairs facing outward along the sides of the top row of blocks. Each row of stairs should be placed one block higher than the previous row, creating an upward slope.
Step 3: Continue placing rows of stairs until the roof reaches the desired height.
Step 4: To finish the roof, add a row of slabs along the center of the roof. This gives it a more polished look and completes the sloped effect.
Step 5: If you want to add a little flair, use slabs to create eaves or overhangs along the sides of the roof.
Building a Steep A-Frame Roof
An A-frame roof has a sharp, symmetrical slant. Here’s how you can create one for your Minecraft home.
Materials:
- Stairs (preferably wood or stone).
- Slabs (optional, for smoother edges).
Steps:
Step 1: Begin by placing blocks along the edge of the top of your building. These will form the structure where the A-frame will rest.
Step 2: Start placing stairs on either side of the roof, ensuring they meet at the top at a peak, forming a “V” shape.
Step 3: Continue placing the stairs in a sloping pattern on both sides of the roof. Each layer of stairs should be placed slightly higher than the previous layer.
Step 4: Once both sides meet at the peak, the roof should form a triangular shape. Add slabs for extra detail along the base of the roof if needed.
Step 5: If desired, add extra support beams or fence posts to give it a more sturdy, rustic appearance.
Building a Mansard Roof
A mansard roof is more complex and features both a shallow and a steep slope. This roof is great for a more refined or elaborate building.
Materials:
- Stairs.
- Slabs.
- Regular blocks (for the base of the roof).
Steps:
Step 1: Begin with a flat roof that spans the entire top of the building.
Step 2: On each side of the flat roof, place stairs facing outward to create the steeper slope. These stairs will gradually increase in height as you move upward.
Step 3: On top of the initial slope, create a shallower slope by continuing with stairs but lowering them to a lower angle. This step adds the complexity of the mansard roof.
Step 4: Finally, finish the roof with slabs for a more refined, symmetrical finish, ensuring that the slopes meet at an appropriate angle.
Adding Extra Touches to Your Roof
After completing the main structure of the roof, consider adding extra details to make it look even more appealing:
Chimneys: Add chimneys using brick or stone blocks for a cozy touch.
Windows and Skylights: Use glass panes to add windows in the roof for natural light or a modern look.
Decorative Features: Place slabs or stairs to create decorative edges or to add more texture to the roof’s design.
Overhangs: Extend the edges of your roof with slabs or blocks to create an overhang, providing shade to your building’s entrance.
FAQs
How to Epoxy a Garage Floor: A Step-by-Step Guide
Epoxy flooring is a popular choice for garage floors due to its durability, aesthetic appeal, and ability to withstand heavy foot traffic and vehicle use. Epoxy is a tough, long-lasting finish that can help protect your garage floor from stains, cracks, and damage, all while providing a sleek and shiny appearance. If you’re considering tackling the project yourself, here’s an informative step-by-step guide on how to epoxy your garage floor.
Why Epoxy Garage Floors?
Epoxy coatings are known for:
Durability: Resistant to stains, chemicals, oil, and water, making them ideal for garage environments.
Aesthetic Appeal: Epoxy floors offer a shiny, glossy finish that enhances the look of your garage.
Ease of Cleaning: The smooth surface of epoxy makes cleaning simple, as dirt, debris, and spills wipe away easily.
Protection: Epoxy creates a tough barrier that protects concrete floors from wear, cracks, and damage over time.
Materials You’ll Need
Before starting the epoxy floor project, gather the following materials:
Epoxy floor coating kit (includes resin and hardener)
Degreaser or concrete cleaner
Scrub brush and mop
Floor grinder or sander
Painter’s tape and plastic sheeting
Mixing bucket and stir stick
Foam roller or paintbrush
Safety gloves, goggles, and mask
Step-by-Step Process for Epoxy Flooring
Step 1: Clean the Floor Thoroughly
Cleaning your garage floor is the first and most important step. A clean surface ensures that the epoxy will bond properly, leading to a smooth, long-lasting finish.
Remove Everything: Clear the garage of all vehicles, tools, and items.
Clean the Concrete: Use a degreaser or concrete cleaner to remove oil, grease, and stains. Scrub the floor with a stiff brush, and rinse it well with water.
Allow Drying: After cleaning, allow the floor to dry completely before moving on to the next step.
Step 2: Repair Cracks and Holes
Epoxy won’t bond well to surfaces that have cracks or holes, so repair any damage in the concrete.
Fill Cracks: Use a concrete crack filler to fill any visible cracks or holes in the floor. Smooth out the filler with a putty knife, and allow it to cure according to the manufacturer’s instructions.
Grind the Surface: Once the filler is dry, use a floor grinder or sander to smooth the surface and ensure proper adhesion for the epoxy.
Step 3: Etch the Concrete
Concrete floors need to be etched (roughened) to create a better bond for the epoxy.
Use a Concrete Etcher: Apply a concrete etching solution or use a diamond grinder to create a rough texture on the floor. This helps the epoxy adhere more effectively.
Rinse and Dry: Once the etching is complete, rinse the floor thoroughly with water and let it dry completely.
Step 4: Tape Off the Edges
Use painter’s tape and plastic sheeting to mask off areas you don’t want to coat, such as baseboards, walls, and doorways. This ensures a clean edge and prevents the epoxy from getting on unintended surfaces.
Step 5: Mix the Epoxy
Most epoxy floor kits come with two components: a resin and a hardener. Follow the manufacturer’s instructions to mix them together. Be sure to mix the epoxy thoroughly in a large bucket. This is crucial, as improper mixing can affect the final finish and durability of the floor.
Step 6: Apply the Epoxy
Start with the Edges: Use a paintbrush to apply the epoxy around the edges of the floor, where the roller can’t reach. This ensures full coverage.
Roll the Epoxy: After the edges are done, use a foam roller to apply the epoxy to the main floor surface. Start in one corner and work your way out, applying the epoxy in small sections. Be sure to apply the coating evenly and in thin layers to avoid puddles or thick spots.
Work Quickly: Epoxy has a limited working time (usually 1-2 hours), so make sure to work quickly and efficiently.
Step 7: Allow Curing Time
Once you’ve applied the first coat, allow it to cure as per the manufacturer’s instructions, usually around 24 hours. In colder temperatures, curing may take longer.
Apply a Second Coat: If necessary, apply a second coat of epoxy for added durability and a deeper finish. Allow the second coat to cure completely before walking or driving on the floor.
Tips for a Successful Epoxy Job
Proper Ventilation: Epoxy can emit strong fumes, so make sure the garage is well-ventilated while you work.
Avoid Humidity: The application of epoxy should be done in dry conditions. Avoid applying on humid days or when there’s a risk of rain.
Be Patient: Allow sufficient curing time between coats and before use to ensure the epoxy has hardened properly.
Check Weather Conditions: If you live in an area with high humidity or cold temperatures, it’s best to apply epoxy in warm, dry conditions.
How Long Does It Last?
Once applied and properly cured, epoxy floors can last anywhere from 5 to 10 years with proper care and maintenance. However, the floor’s lifespan can be affected by factors such as heavy traffic, exposure to chemicals, and how well the floor is maintained.
FAQs
How long does it take for an epoxy garage floor to dry?
Typically, an epoxy floor requires 24-48 hours to dry completely, depending on the temperature and humidity. It’s important to allow adequate time for curing before walking or driving on the surface.
Can I apply epoxy over an existing garage floor coating?
Yes, you can apply epoxy over an existing coating, but the old coating must be clean, smooth, and well-adhered to the concrete. In some cases, it may be necessary to remove the old coating before applying the new epoxy.
How long does an epoxy garage floor last?
With proper maintenance, an epoxy garage floor can last anywhere from 5 to 10 years. The durability will depend on factors such as traffic, exposure to chemicals, and regular upkeep.
Conclusion
Epoxying your garage floor is an excellent way to improve the durability, appearance, and functionality of your garage space. By following these simple steps, you can transform your garage floor into a tough, easy-to-clean surface that will stand up to years of wear and tear. With the right tools, preparation, and patience, your garage floor will be looking brand new in no time.
How to Relocate When You Have Mobility Issues
Moving to a new home presents significant challenges, particularly for people with mobility limitations.Continue reading →
How to Replace Garage Door Springs: A Step-by-Step Guide
Replacing garage door springs can be a challenging task, but with proper tools, safety precautions, and guidance, it can be done successfully. This guide will walk you through the process step-by-step.
Why Replacing Garage Door Springs Is Important
Garage door springs play a crucial role in counterbalancing the weight of the door, making it easy to open and close. Over time, these springs can wear out or break due to tension and repeated use. Replacing them ensures the door operates smoothly and safely.
Types of Garage Door Springs
Torsion Springs
Located above the garage door.
Wind up to store energy, which assists in lifting the door.
Extension Springs
Positioned along the sides of the door tracks.
Stretch and contract to support door movement.
Understanding the type of spring you have is vital before starting the replacement process.
Tools and Materials Needed
Replacement springs (torsion or extension)
Adjustable wrench
Locking pliers
Winding bars (for torsion springs)
Socket set
Safety goggles
Gloves
Ladder
Tape measure
Marker or chalk
C-clamps or vice grips
Safety Precautions Before Starting
Disconnect Power – Unplug the garage door opener.
Secure the Door – Use C-clamps to keep the door in place.
Wear Safety Gear – Gloves and goggles protect against injuries.
Work with a Partner – Extra help ensures added safety.
Step-by-Step Instructions for Torsion Springs
Step 1: Measure the Existing Spring
Measure the length, inside diameter, and wire size of the existing spring to ensure you purchase the correct replacement.
Step 2: Secure the Garage Door
Clamp the garage door to the track using C-clamps or vice grips to prevent movement.
Step 3: Loosen the Broken Spring
Insert winding bars into the winding cone of the spring.
Loosen the set screws using an adjustable wrench while keeping firm control of the winding bar.
Step 4: Unwind the Old Spring
Carefully unwind the broken spring using winding bars.
Repeat the process on the other side if there are two springs.
Step 5: Remove the Old Springs
Detach the springs from the center bracket.
Slide the springs off the torsion bar.
Step 6: Install New Springs
Slide the new springs onto the torsion bar.
Attach them to the center bracket.
Step 7: Wind the New Springs
Use winding bars to wind the springs to the appropriate tension (check manufacturer’s instructions).
Tighten the set screws to secure the springs.
Step 8: Test the Door
Remove the clamps or vice grips.
Slowly lift the door manually to test the tension.
Reconnect the opener and test it electronically.
Step-by-Step Instructions for Extension Springs
Step 1: Secure the Door
Clamp the door to the track to prevent it from opening during the process.
Step 2: Remove the Safety Cables
Unhook the safety cables that run through the springs.
Step 3: Detach the Old Springs
Loosen the bolts and remove the extension springs from the brackets and pulley system.
Step 4: Install New Springs
Attach the new springs to the brackets and pulley system.
Ensure the safety cables are properly threaded through the new springs.
Step 5: Adjust Tension
Check the tension to make sure the door operates smoothly.
Step 6: Test the Door
Remove the clamps and test the door manually and with the opener.
Common Mistakes to Avoid
Using Incorrect Spring Size – Always measure before purchasing replacements.
Improper Winding – Incorrect winding can lead to poor operation or accidents.
Skipping Safety Steps – Failure to secure the door or wear protective gear can lead to injuries.
Not Testing Tension – Always test door balance and operation after replacing springs.
When to Call a Professional
If you are uncomfortable handling high-tension springs or lack the required tools, it’s best to hire a professional. Attempting this repair without experience can lead to serious injuries.
Maintenance Tips for Longer Spring Life
Lubricate the springs regularly with garage door lubricant.
Inspect for signs of wear, such as rust or gaps in the coils.
Test the balance of the door periodically by disconnecting the opener and lifting the door manually.
Replace both springs if one breaks, as they wear out at the same rate.
FAQs
How do I know if my garage door springs are broken?
If your garage door won’t open, opens unevenly, or makes loud noises, the springs may be broken. Visually inspect the springs for gaps or damage.
Can I replace garage door springs myself?
Yes, but it requires proper tools, safety precautions, and following instructions carefully. If unsure, consider hiring a professional.
How often should garage door springs be replaced?
Garage door springs typically last 7-9 years with normal use. Replace them sooner if signs of wear, rust, or stretching appear.
Final Thoughts
Replacing garage door springs requires patience, precision, and adherence to safety measures. By following this guide, you can restore your garage door to proper working condition. Regular maintenance and inspections can extend the life of your springs and prevent sudden failures. If you need additional help, don’t hesitate to contact a professional garage door technician.