
Key Takeaways
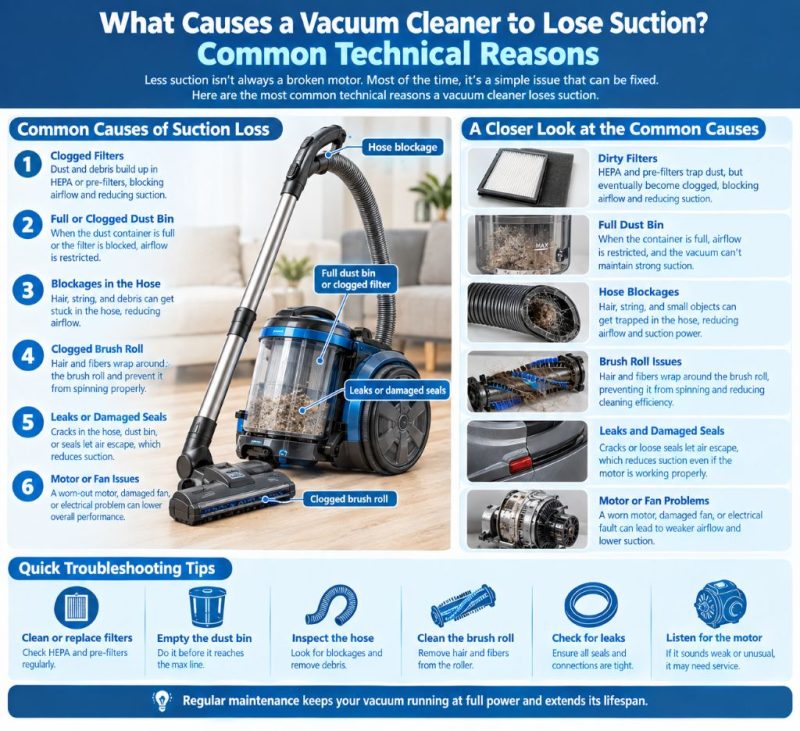
- Full bins, clogged filters, and blocked hoses cause most suction loss.
- Worn brushes and stretched belts weaken agitation and pickup.
- Cracked seals and gaskets leak air and cut cleaning power.
- Damaged hoses and worn carbon brushes starve the motor of airflow.
- Monthly checks prevent nearly all common suction problems.
A vacuum that suddenly feels weak is frustrating. You push it across the carpet, but it leaves dirt behind. The good news is that most suction loss has simple, fixable causes. Suction depends on one thing: steady airflow. Anything that blocks, leaks, or weakens that airflow reduces cleaning power. Therefore, every suction problem traces back to one of three areas. The air path is blocked, the seals leak, or the motor is failing.
Technicians see the same culprits over and over. Full dust bins, dirty filters, and clogged hoses top the list. According to vacuum repair professionals, most “broken” vacuums brought into shops only need basic maintenance. The machine itself is usually fine.
This guide walks through the most common technical reasons for suction loss. You will learn how to spot each problem, confirm it, and fix it yourself. Additionally, you will learn when a repair is worth it and when replacement makes more sense.
Full Dust Bin or Bag
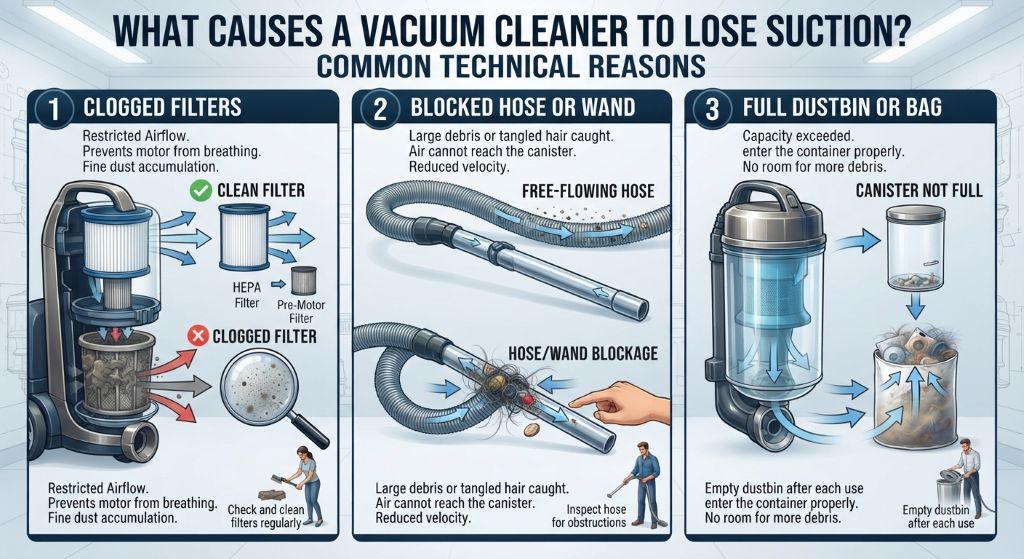
The dust bin or bag is the first place to check. It sits directly in the airflow path, so it chokes suction faster than any other part. A bin filled past the max line leaves little room for air to pass.
Bagged vacuums suffer here more than bagless models. A bag acts as a filter, and its pores clog with fine dust as it fills. Consequently, airflow drops long before the bag looks completely full. Many bags feel only two-thirds full when suction already fades.
Bagless vacuums face a similar issue. Fine dust packs against the bin walls and blocks the cyclone outlets. Additionally, packed dust in the bin reduces the spin space that cyclonic separation needs.
Here is what to do:
- Turn off and unplug the vacuum first.
- Empty the bin or replace the bag.
- Rinse a bagless bin with cold water and let it dry fully.
- Check the max fill line and never exceed it.
Therefore, make emptying a habit. Empty the bin after every major cleaning session, not when it looks full. Bag users should replace bags at half to two-thirds full, especially with fine dust like flour or ash.
One warning applies to bagless owners. Never empty the bin while it is attached to the vacuum. Dust puffs back into the machine and clogs the pre-motor filter. Always detach the bin first.
Clogged or Dirty Filters
Filters protect the motor from fine dust, but they clog over time. A clogged filter chokes airflow exactly like a full bag does. Consequently, the motor works harder while pulling less air through.
Most vacuums have two or more filters. A pre-motor filter sits before the motor and catches the finest dust. A post-motor or exhaust filter cleans the outgoing air. Some models add a washable foam layer or a HEPA filter for allergens.
Each filter clogs at a different speed. Pre-motor filters clog fastest because they see the most dust. Therefore, they need the most frequent attention. HEPA filters clog slowly but cost more to replace.
Follow this filter schedule:
- Washable foam filters: rinse monthly with cold water.
- Pre-motor filters: rinse or replace every 1 to 3 months.
- HEPA filters: replace every 6 to 12 months.
- Always dry washed filters for 24 hours before reuse.
Never wash a filter that is not marked washable. Paper filters fall apart when wet. Additionally, never dry filters with a heater or hair dryer. Heat warps the material and ruins the fit.
A quick test reveals a clogged filter. Remove the filter and run the vacuum briefly on a hard floor. If suction returns instantly, the filter was the problem. However, never run the vacuum long without a filter, because fine dust reaches the motor.
Blocked Hoses, Wands, and Attachments
Hoses carry all the airflow, so a blockage anywhere stops cleaning power downstream. Most clogs form where the hose bends or narrows. Common culprits include socks, food bags, toy pieces, and packed pet hair.
The hose connection point is another hotspot. Debris collects where the hose meets the machine or the wand. Additionally, the suction opening at the head often traps large items that let only thin air through.
You can find a blockage in minutes. Detach the hose and drop a small coin or marble through it. If the coin stops, the clog sits at that point. Then push it free with a broom handle or straightened hanger.
Check these spots in order:
- The hose entrance at the vacuum body.
- The bends and curves along the hose length.
- The wand junction points.
- The opening at the floor head.
- Any attachment tools you use often.
Cracked hoses cause suction loss too, but differently. A crack lets air leak in, so less air comes through the head. Cover the hose end with your hand to test. Weak or no response means a leak somewhere along the line.
Additionally, check for kinks during cleaning. A sharply bent hose restricts flow just like a clog. Straighten the hose path before blaming the machine.
Worn Brush Roll and Belt Problems
Weak pickup on carpet often is not a suction problem at all. The brush roll and belt do the agitation, and worn parts leave dirt behind. Consequently, the vacuum feels weak even with strong airflow.
Brush bristles wear short over time. Short bristles cannot reach the carpet base, so embedded dirt stays put. Additionally, hair wraps around the roll and slows the spin. A wrapped brush acts like a brake and beats less dirt loose.
The belt connects the motor to the brush roll. Belts stretch, crack, and slip over time. A slipping belt spins the brush slowly or not at all. Therefore, the carpet gets no agitation, even though suction sounds normal.
Here are the warning signs:
- The brush roll does not spin at all.
- The roll spins slowly or stops under pressure.
- A burning rubber smell during carpet cleaning.
- Visible cracks or shine on the belt surface.
Check the belt by removing the base plate. Turn the roll by hand and watch the belt. Cracks, glazing, or loose fit mean replacement time. Belts cost only a few dollars and take minutes to swap.
Brush rolls also deserve a monthly check. Pull out the roll, cut away wrapped hair, and inspect the bristles. If bristles look bent, frayed, or melted, replace the roll. A fresh roll often restores carpet pickup instantly.
Therefore, treat your carpet complaints as brush complaints first. Strong suction with weak pickup almost always points to the head, not the motor.
Air Leaks, Seals, and Gasket Damage
Airflow needs a sealed path from the floor head to the exhaust. Any leak along that path steals suction before it reaches your carpet. Consequently, even a strong motor cannot compensate for leaking seals.
Gaskets sit at every connection point. The bin meets the body through a rubber gasket. The head connects to the wand through another seal. Additionally, the filter housing and door covers use seals to stay airtight.
These seals fail in predictable ways. Foam gaskets flatten with age and lose their spring. Rubber seals crack in dry air. Additionally, a badly seated bin or door creates an instant gap. A single misplaced gasket can halve your suction.
Check your seals with this routine:
- Inspect every visible gasket for cracks or flattening.
- Press the bin and doors until they click fully into place.
- Listen for hissing sounds during operation.
- Run the vacuum and feel along the seams for escaping air.
A simple test finds hidden leaks. Cover the end of the wand with your palm. The motor tone should change sharply as suction builds. A weak response, or air hissing at the body, means a leak somewhere upstream.
Additionally, check where the hose inserts into the machine. Worn insertion points wiggle loose and draw air around the connection. A wrap of electrical tape sometimes restores the fit temporarily.
However, some leaks sit deep inside the machine. Cracked housings and split internal ducts need professional repair. If seals look fine but suction stays weak, an internal crack may be the culprit.
Motor Wear and Carbon Brush Issues
The motor creates the suction, and motors wear out slowly. Most vacuum motors last between 8 and 12 years with normal use. However, several parts inside fail before the motor itself does.
Carbon brushes conduct electricity into the spinning motor armature. These brushes wear down like pencil lead over years of use. When they get too short, the motor runs weak, sparkles, or stops entirely. Therefore, weak suction in an old vacuum often means worn carbon brushes.
Motor bearings fail too. Bearings let the armature spin freely, and they wear out over time. A failing bearing makes a grinding or squealing noise. Additionally, it slows the fan and reduces airflow.
Watch for these motor warning signs:
- Suction that fades gradually over months.
- A burning smell with no belt or brush problems.
- Sparks visible near the motor housing.
- Grinding, squealing, or rattling noises.
- The motor cutting out during long sessions.
Additionally, overheating shortens motor life. Clogged filters and full bins force the motor to work harder, which builds heat. Therefore, good maintenance protects the motor as much as it protects suction.
Repair decisions depend on vacuum value. Carbon brushes and belts are cheap and easy fixes for handy owners. Motor replacements cost 100 dollars or more in parts and labor. Consequently, a premium vacuum justifies repair, while a budget model usually does not.
When to Repair and When to Replace
Not every weak vacuum deserves a repair. The decision depends on age, value, and the cost of the fix. A simple rule helps: compare the repair quote to the price of a comparable new machine.
Use this quick guide:
- Under 50 dollars: almost always worth repairing.
- 50 to 150 dollars: worth it for premium or newer machines.
- Over 150 dollars: consider replacement, except for high-end models.
- Motor failure on a budget vacuum: replace the vacuum.
Age matters too. A vacuum older than 8 years with multiple problems rarely justifies a big repair. Meanwhile, a 3-year-old machine with one fault usually deserves fixing. Additionally, check whether replacement parts stay available for your model. Discontinued parts turn small faults into forced replacements.
Frequently Asked Questions
Why did my vacuum lose suction suddenly?
Sudden suction loss usually means a clog or a dislodged part. Check the hose, the bin seating, and the filter placement first. Most sudden cases take minutes to fix.
How often should I replace vacuum filters?
Replace paper filters every 3 to 6 months. Wash foam filters monthly and replace them yearly. HEPA filters last 6 to 12 months depending on usage.
Can a full bag really reduce suction that much?
Yes. A bag acts as a filter, and its pores clog with dust as it fills. Suction often fades when the bag is only two-thirds full.
Why is suction weak only on carpet?
Weak carpet pickup usually points to the brush roll or belt, not suction. Worn bristles or a slipping belt stop agitation, so embedded dirt stays put.
Is it worth repairing a vacuum motor?
For premium machines, often yes. For budget models under 200 dollars, rarely. Compare the repair quote to the price of a comparable new vacuum first.
Conclusion
Suction loss almost always has a traceable technical cause. Full bins, clogged filters, and blocked hoses block the airflow. Meanwhile, worn brushes, belts, seals, and motor parts weaken the system from the inside. The good news is that most fixes cost little and take minutes. Empty the bin, rinse the filters, clear the hose, and check the belt. These four habits prevent nearly every common suction problem. Additionally, a monthly inspection catches worn parts before they fail.
Therefore, work through the causes in order before paying anyone. Start with the bin, then the filters, then the hose, then the head. You will solve most cases without tools or spare parts.
Ready to test your vacuum right now? Unplug it, empty the bin, and check the filters. Ten minutes of basic care often restores full suction without spending a single dollar.
