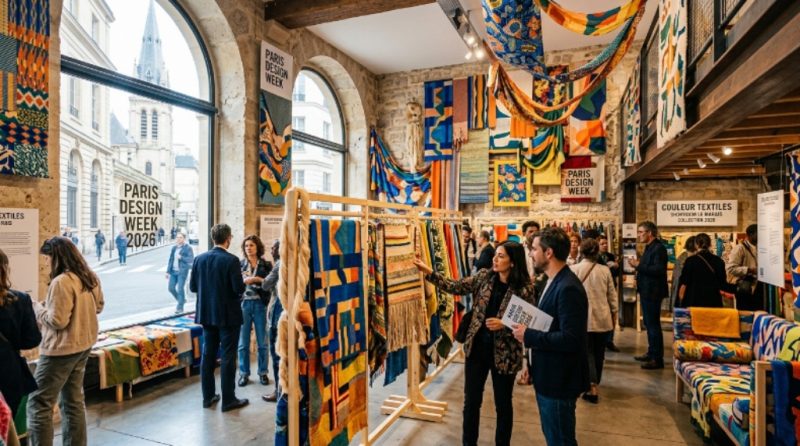
Smart Thermostats: How They Save You Money

Smart Thermostats: How They Save You Money

In today’s technologically advanced world, smart thermostats have emerged as a game-changer in home heating and cooling systems. These devices not only enhance comfort but also significantly reduce energy costs. This article explores how smart thermostats function, their benefits, and how they can help you save money on your utility bills.

What is a Smart Thermostat?

A smart thermostat is a Wi-Fi-enabled device that allows you to control your home’s heating and cooling system remotely. Unlike traditional thermostats, which require manual adjustments, smart thermostats can learn your schedule and preferences, automatically adjusting the temperature for optimal efficiency. They can be controlled through smartphone apps, voice commands, or via built-in touch screens, providing convenience and flexibility.

How Smart Thermostats Save You Money

Energy Efficiency

Smart thermostats are designed to optimize energy usage. They analyze your heating and cooling habits and adjust accordingly. For example, if you typically leave for work at 8 a.m. and return at 6 p.m., the thermostat can learn this pattern and automatically lower the temperature when you leave and raise it again before you return. This prevents energy waste by ensuring that heating or cooling is only active when needed.

Remote Control and Monitoring

With a smart thermostat, you can monitor and control your home’s temperature from anywhere using your smartphone. If you forget to adjust the temperature before leaving for vacation, you can simply access the app and make changes on the go. This feature is particularly useful for managing your home’s climate during extreme weather, preventing unnecessary energy consumption.

Usage Reports and Insights

Many smart thermostats provide detailed energy usage reports and insights. These reports can show you how much energy you’re using over time and help identify patterns or habits that may be causing excessive energy consumption. By understanding your usage, you can make informed decisions about your heating and cooling practices, further reducing your energy bills.

Geofencing Technology

Geofencing technology allows smart thermostats to detect your location using your smartphone’s GPS. When you leave your home, the thermostat can automatically adjust to an energy-saving mode. Similarly, when you approach home, it can prepare your living space to your preferred temperature, ensuring comfort while minimizing energy use.

Integration with Smart Home Systems

Smart thermostats can integrate with other smart home devices, such as smart lights, security systems, and home assistants. This integration enables you to create a comprehensive smart home environment that optimizes energy efficiency. For instance, you can set your thermostat to lower the temperature when the security system is activated and you leave the house, ensuring that your heating or cooling system isn’t working when it isn’t needed.

Enhanced Comfort

By learning your schedule and preferences, smart thermostats can create a comfortable living environment. They can adjust temperatures throughout the day, ensuring you come home to a pleasant atmosphere without the need for excessive heating or cooling. This not only enhances comfort but also prevents unnecessary energy expenditure.

Smart Alerts and Maintenance Reminders

Smart thermostats can send alerts when it’s time for regular maintenance, such as changing the air filter or scheduling HVAC service. Regular maintenance ensures your system operates efficiently, which can lead to further savings on energy bills. By keeping your heating and cooling systems in top shape, you minimize the risk of costly repairs or replacements down the line.

Conclusion

The benefits of smart thermostats extend beyond mere convenience. They are a powerful tool for reducing energy consumption and saving money on utility bills. With features that optimize heating and cooling schedules, remote access, energy usage reports, and integration with other smart devices, these thermostats offer a sustainable and economical solution for homeowners.

By investing in a smart thermostat, you can enjoy enhanced comfort, greater control over your energy consumption, and significant savings on your monthly bills. Whether you’re looking to cut costs or reduce your carbon footprint, a smart thermostat is an excellent addition to any modern home.

Comparing Gas vs. Electric Stoves: Which is Better for Your Home?

Comparing Gas vs. Electric Stoves

When it comes to outfitting your kitchen, choosing between a gas and an electric stove is one of the most significant decisions you’ll make. Both options have their pros and cons, and the best choice ultimately depends on your cooking style, budget, and kitchen setup. This article will provide an in-depth comparison of gas and electric stoves, helping you determine which is better suited for your home.

Performance and Cooking Speed

Gas Stoves

  • Instant Heat: Gas stoves provide instant heat when you turn them on, allowing for immediate cooking adjustments. This feature is particularly beneficial for recipes requiring precise temperature control.
  • Visual Flame: The visible flame allows cooks to gauge heat levels easily, making it easier to achieve desired results, whether simmering or boiling.

Electric Stoves

  • Consistent Heat: Electric stoves tend to distribute heat more evenly, which can be advantageous for baking and simmering. The coils or smooth tops maintain a stable temperature.
  • Slow to Adjust: Electric stoves take longer to heat up and cool down compared to gas stoves, which can slow down the cooking process if you frequently adjust heat levels.

Cost and Energy Efficiency

Gas Stoves

  • Operating Costs: Natural gas is generally less expensive than electricity, which can result in lower operating costs over time. However, this can vary based on local energy prices.
  • Initial Investment: Gas stoves can be more expensive to purchase upfront compared to electric models, especially if you need to install gas lines.

Electric Stoves

  • Lower Initial Cost: Electric stoves typically have a lower purchase price and may be more readily available in a wider variety of styles.
  • Higher Operating Costs: While electric stoves can be cheaper to install, they may incur higher operating costs over time, depending on your energy provider’s rates.

Installation and Maintenance

Gas Stoves

  • Installation Requirements: Gas stoves require proper ventilation and gas lines, which can complicate installation and may require professional help.
  • Maintenance: Gas stoves can require more maintenance, such as cleaning burners and ensuring proper gas flow, but they are generally durable and long-lasting.

Electric Stoves

  • Easier Installation: Electric stoves only need an electrical outlet, making them easier to install in most kitchens without significant modifications.
  • Less Maintenance: Electric stoves typically require less maintenance, with smooth-top models being particularly easy to clean. However, damaged coils may need to be replaced over time.

Safety Features

Gas Stoves

  • Gas Leaks: One of the main concerns with gas stoves is the potential for gas leaks, which can be dangerous if not properly maintained. Installing a gas leak detector can enhance safety.
  • Heat Control: Gas flames can be harder to control than electric heat, which may pose a risk if not monitored carefully.

Electric Stoves

  • No Gas Hazards: Electric stoves eliminate the risks associated with gas leaks, making them a safer option for many households.
  • Cooler Surface: Electric stoves may remain hot longer after use, but they don’t pose the same immediate risk as a flame, especially with child safety locks available on many models.

Cooking Preferences and Styles

Gas Stoves

  • Professional Preference: Many professional chefs prefer gas stoves for their responsiveness and control over heat levels, making them ideal for high-heat cooking methods like stir-frying and searing.
  • Specialty Cooking: Gas stoves are often favored for certain cooking techniques, such as flambéing or using certain cookware that requires an open flame.

Electric Stoves

  • Baking: Electric stoves, especially those with convection ovens, are preferred by many bakers due to their ability to maintain consistent temperatures, which is crucial for baked goods.
  • Ease of Use: Electric stoves may be easier for novice cooks to use, as they provide a more consistent cooking experience without the need to manage an open flame.

Conclusion: Which is Better for Your Home?

The decision between a gas and electric stove ultimately depends on your cooking habits, budget, and kitchen setup. Here are some factors to consider:

  • Choose a gas stove if: You value instant heat, enjoy cooking with precise temperature control, and prefer a professional cooking experience. Gas stoves are also a great choice for those who regularly cook with high heat or require flexibility in their cooking methods.
  • Choose an electric stove if: You prioritize ease of installation, maintenance, and safety. Electric stoves may be more suitable for those who enjoy baking or prefer a more straightforward cooking process.

FAQs

Are gas stoves more energy-efficient than electric stoves?
Gas stoves typically have lower operating costs since natural gas is often less expensive than electricity. However, the energy efficiency can vary based on local energy prices, cooking habits, and the specific models of the stoves.

How do I know if I should choose a gas or electric stove for my kitchen?
Consider your cooking style and preferences. If you value instant heat and precise temperature control, a gas stove may be better. If you prefer consistent cooking temperatures and easier maintenance, an electric stove might be the right choice.

Are there safety concerns associated with gas stoves?
Yes, gas stoves pose potential risks, such as gas leaks and open flames. It’s essential to ensure proper installation, regular maintenance, and the use of gas leak detectors for safety. Electric stoves eliminate these risks but can still pose hazards if not monitored, as their surfaces can remain hot after use.

In summary, both gas and electric stoves have their advantages and drawbacks. Consider your cooking preferences, budget, and lifestyle when making this important decision for your kitchen. No matter which option you choose, investing in quality cookware and appliances will elevate your cooking experience and enhance your culinary skills.

How to Choose the Best Soundbar for Your Living Room

How to Choose the Best Soundbar for Your Living Room

The soundbar has become an essential accessory for enhancing the home theater experience. With TVs getting thinner and their built-in speakers often underwhelming, a soundbar can significantly improve sound quality, bringing depth, clarity, and immersion to your living room. But with so many options on the market, it can be tricky to know how to choose the right one for your space. Here’s a guide to help you make the best decision.

A Guide to Choose the Best Soundbar for Your Living Room

Consider the Size of Your Living Room

The first thing to think about when choosing a soundbar is the size of your living room. A larger space may require a more powerful soundbar with multiple speakers or even a separate subwoofer to deliver the best sound experience. In contrast, a smaller room can benefit from a more compact model, which can still offer excellent sound without overwhelming the space.

  • For small to medium-sized rooms: A simple 2.1 soundbar (two main speakers and a subwoofer) is often enough to fill the room with clear, powerful audio.
  • For larger rooms: You may want to look for soundbars with more channels (e.g., 5.1 or 7.1 systems), which often include additional surround sound speakers for a more immersive experience.

Check Connectivity Options

How you connect your soundbar to your TV is another important factor. Different soundbars come with a range of connectivity options, and it’s essential to ensure compatibility with your existing devices.

  • HDMI ARC/eARC: HDMI ARC (Audio Return Channel) or eARC (enhanced ARC) allows a single HDMI cable to handle both audio and video signals. This is ideal for reducing cable clutter and ensuring high-quality sound transmission.
  • Optical Input: If your TV doesn’t support HDMI ARC, an optical input is another option that still provides great sound.
  • Bluetooth/Wi-Fi: Many modern soundbars come with wireless connectivity options like Bluetooth or Wi-Fi, making it easy to stream music directly from your smartphone, tablet, or other devices without using any cables.

Decide on Channels and Surround Sound

Soundbars come in various channel configurations, which refer to how many separate audio channels the device can produce. The most common are:

  • 2.0 Channels: Two speakers, no subwoofer. Good for basic audio improvement over TV speakers.
  • 2.1 Channels: Two speakers and one subwoofer for enhanced bass. Great for everyday TV viewing and music.
  • 5.1 Channels: Includes five speakers (three in the soundbar and two external surround speakers) and a subwoofer. This is ideal for a home theater experience.
  • 7.1 Channels and Above: These systems offer a higher level of surround sound for a fully immersive experience, often including multiple satellite speakers or upward-firing drivers for 3D audio effects like Dolby Atmos.

If you’re passionate about cinema-quality sound, a soundbar with Dolby Atmos or DTS support is a great choice. These technologies provide a sense of height, making sound seem like it’s coming from all around you, not just in front.

Sound Quality: Look for Built-in Subwoofers and Tweeters

Sound quality should always be a top consideration. Soundbars with separate or built-in subwoofers offer better bass performance, which is essential for movies, games, and music. Some higher-end models also come with dedicated tweeters for better treble performance, delivering crystal-clear highs that enhance vocals and dialogue clarity. If deep, rich bass is a priority, consider a soundbar with an external subwoofer. Built-in subwoofers are convenient but might not offer the same level of depth and power as an external one.

Smart Features and Voice Control

Many modern soundbars offer smart features, making them more than just a simple speaker. These often include built-in voice assistants like Amazon Alexa or Google Assistant, which allow you to control the soundbar and other smart home devices using your voice.

  • Smart sound modes: Some soundbars can automatically adjust their sound settings based on what you’re watching (movies, news, music), enhancing the experience.
  • Voice control: Look for soundbars with built-in voice assistants for hands-free control of your TV, soundbar, and even lights.

Mounting and Placement Options

Where you place your soundbar can affect the sound quality. Most soundbars are designed to be mounted on the wall or placed directly below your TV. Make sure the soundbar you choose fits well with your TV setup and doesn’t block any sensors or IR receivers on the TV.

  • Wall-mounted soundbars: If you’re tight on space, consider mounting the soundbar directly beneath your TV for a sleek, uncluttered look.
  • TV stand soundbars: If you prefer to place the soundbar on a TV stand, make sure it’s not too wide or tall, as this could interfere with the view of your TV screen or remote signal.

Budget

Soundbars come in a wide range of prices, from budget models under $100 to high-end models costing over $1,000. While expensive soundbars often come with better sound quality, more connectivity options, and advanced features, there are excellent mid-range models that provide fantastic value for money.

  • Budget soundbars: You can find good-quality 2.0 or 2.1 soundbars in the $100-$300 range that offer a significant upgrade over TV speakers.
  • Mid-range soundbars: In the $300-$600 range, you’ll find 3.1 and 5.1 channel soundbars with extra features like wireless subwoofers, surround sound, and voice control.
  • High-end soundbars: For $600 and above, you’re looking at models with Dolby Atmos, DTS, and premium audio components for an immersive theater-like experience.

Brand Reputation and Reviews

Finally, consider brand reputation and user reviews. Well-known audio brands like Sonos, Bose, Yamaha, and Sony tend to have a strong track record for producing high-quality soundbars. Reading customer reviews can also give you insight into real-world performance and help you identify any potential issues before making a purchase.


FAQS:

What size soundbar should I get for my living room?

The size of your soundbar should generally match the size of your TV and the room. For smaller rooms, a compact 2.1-channel soundbar is sufficient, while larger living rooms may benefit from a 5.1 or 7.1 system with additional speakers or a subwoofer. Ideally, the soundbar should be slightly narrower than your TV for the best aesthetic and acoustic balance.

Do I need a separate subwoofer for my soundbar?

Not necessarily, but having a separate subwoofer enhances the bass, providing a fuller, richer sound, especially for movies, games, and music. Some soundbars come with built-in subwoofers, but external ones generally offer better performance. If deep bass is important to you, a soundbar with a wireless subwoofer is worth considering.

What’s the difference between a 2.1 and a 5.1 soundbar?

A 2.1 soundbar includes two main speakers and a subwoofer, providing a basic stereo sound with enhanced bass. A 5.1 soundbar adds more channels, with five speakers and a subwoofer, offering a surround sound experience for a more immersive home theater effect. If you watch a lot of movies or play games, a 5.1 system is better suited for enveloping audio.


Conclusion

Choosing the best soundbar for your living room involves balancing your space, budget, and audio preferences. Whether you’re looking for a basic sound upgrade or a full cinematic experience, there’s a soundbar that can meet your needs. Keep these factors in mind, and you’ll be able to find a soundbar that transforms your living room into an audio haven.

How to Choose the Right Dishwasher for Your Family’s Needs

How to Choose the Right Dishwasher for Your Family's Needs

A dishwasher is an essential appliance in many homes, saving time and energy while ensuring dishes are cleaned efficiently. But with so many options on the market, choosing the right one can be overwhelming. Here’s a guide to help you make the best decision for your family.

A Guide to Choose the Right Dishwasher for Your Family’s Needs

Family Size and Dishwasher Capacity

One of the first factors to consider when choosing a dishwasher is the size of your family. The more people in your household, the more dishes you’ll likely generate.

  • Small families (1-2 people): If you have a smaller household or don’t generate a lot of dirty dishes, a compact or slimline dishwasher might be a good option. These dishwashers are usually about 18 inches wide and take up less space in your kitchen, perfect for smaller kitchens or apartments.
  • Medium to large families (3-5 people): A standard 24-inch dishwasher is ideal for most families. It provides enough space to wash dishes from multiple meals a day, and the added capacity ensures fewer loads.
  • Large households (6+ people): For large families or those who entertain often, consider a model with extra racks or specialized loading zones. Some dishwashers come with third racks for cutlery and small items, which increases the usable capacity.

Energy Efficiency and Water Usage

Dishwashers vary significantly in terms of energy and water consumption. Choosing an energy-efficient model can help save money on utility bills while being better for the environment.

  • Energy Star Ratings: Look for dishwashers with the Energy Star label. These models use less electricity and water, without compromising performance. An Energy Star-rated dishwasher can use up to 12% less energy and 30% less water than non-rated models.
  • Eco-Friendly Options: Some models come with eco-friendly or water-saving settings, which can be especially helpful if you live in an area with water restrictions or want to reduce your household’s carbon footprint.

Noise Levels

If your kitchen is near your living or sleeping areas, noise can be a significant factor when choosing a dishwasher. Dishwashers are measured in decibels (dB), with lower numbers indicating quieter operation.

  • Quiet models: A dishwasher rated below 45 dB is considered extremely quiet and won’t disturb nearby rooms. These are perfect for open-plan homes where the kitchen is part of a shared space.
  • Mid-range noise levels: Dishwashers in the 45-50 dB range are quiet enough for most homes and tend to be more affordable.
  • Noisier models: If you don’t mind some sound or plan to run your dishwasher overnight or while you’re out, models above 50 dB can save money but might be noticeable while running.

Loading Flexibility and Features

The layout and design of dishwasher racks and loading zones can significantly impact the ease of use. Consider your family’s dishwashing habits:

Adjustable Racks: Some dishwashers offer adjustable upper racks or foldable tines, allowing you to fit larger pots, pans, or oddly shaped items. If you frequently wash bulky items, these features can be a lifesaver.

Cutlery trays vs. baskets: Some models come with a dedicated cutlery tray, which offers better cleaning and organization for utensils. Traditional baskets can be more space-efficient, but trays ensure each utensil is fully exposed to water jets for optimal cleaning.

Third Rack: An increasing number of dishwashers come with a third rack, typically for small items like lids, utensils, and cutlery. It adds a surprising amount of capacity without taking up much space.

Cleaning Performance and Cycles

The variety of cleaning cycles offered by a dishwasher can make a big difference in its efficiency and usefulness.

  • Basic Cycles: Most dishwashers come with basic settings like light, normal, and heavy wash cycles. If you only need to clean everyday dishes, these will often suffice.
  • Specialty Cycles: If you often need to clean delicate glassware, sanitize baby bottles, or deal with heavily soiled pots and pans, look for dishwashers with specialized cycles. Some models have a steam-cleaning function or high-temperature sanitizing modes for deep cleaning and bacteria removal.
  • Quick Wash: For busy households, a dishwasher with a quick-wash option can be invaluable, getting your dishes clean in under an hour for lighter loads.

Budget Considerations

Dishwasher prices can range widely, from under $300 for basic models to over $1,500 for high-end options. Determine your budget before shopping to help narrow down your choices.

  • Basic Models: These typically offer fewer features but can still clean efficiently. They may be noisier and lack advanced features like adjustable racks or specialized wash cycles.
  • Mid-range Models: Expect to pay between $500 and $1,000 for a model with a good balance of features, including adjustable racks, Energy Star certification, and a variety of wash cycles.
  • High-end Models: If you’re willing to spend over $1,000, you can enjoy ultra-quiet operation, smart technology integration, additional cycles, and premium finishes.

Smart Features and Connectivity

For tech-savvy families, a smart dishwasher may be appealing. These models can be connected to Wi-Fi and controlled via smartphone apps or integrated with smart home systems.

  • Remote Monitoring and Control: Some smart dishwashers allow you to start, pause, or check the status of your dishwasher from your phone.
  • Alerts and Maintenance: Many models offer alerts when the cycle is complete or if there’s a problem (e.g., if a leak is detected).
  • Voice Assistant Compatibility: High-end models may be compatible with voice assistants like Alexa or Google Assistant, allowing for hands-free control.

Aesthetic and Design

Finally, consider the overall look of the dishwasher in your kitchen. While stainless steel is a popular choice for its sleek and modern look, many dishwashers come in a range of finishes, including black, white, and even custom panel-ready models that blend seamlessly with your cabinetry.

  • Hidden Controls: Some dishwashers come with controls on the top edge of the door, making them invisible when the dishwasher is closed. This gives a cleaner, more modern appearance.
  • Fingerprint-resistant Finishes: If you have young children, you may appreciate models with fingerprint-resistant finishes that stay cleaner-looking for longer.


FAQS:

What size dishwasher is best for my family?

The size of the dishwasher depends on the number of people in your household. For a small family (1-2 people), a compact 18-inch dishwasher is sufficient. A standard 24-inch model is ideal for medium to large families (3-5 people), while households with 6 or more people might benefit from a larger dishwasher with extra racks or loading flexibility.

How important is energy efficiency when choosing a dishwasher?

Energy efficiency is crucial as it can save money on utility bills and reduce water consumption. Look for dishwashers with an Energy Star rating, as they use less electricity and water. Models with eco-friendly settings further optimize water and energy use, making them a great choice for environmentally conscious households.

What are the key features to look for in a family-friendly dishwasher?

Some important features include adjustable racks for larger items, a third rack for extra cutlery space, quiet operation (under 45 dB), and a variety of wash cycles, including quick wash and sanitizing options. Smart features, such as Wi-Fi connectivity and voice control, can add convenience but aren’t essential for everyone.

Conclusion

Choosing the right dishwasher for your family’s needs involves considering your household size, budget, desired features, and energy efficiency. By assessing these factors, you can find a model that not only fits your kitchen but also makes your daily life easier. Whether you opt for basic functionality or a high-tech smart dishwasher, the right appliance will save you time and effort for years to come.

Comparing Gas vs. Electric Stoves: Which is Better for Your Home?

Gas vs Stoves

When it comes to choosing the right stove for your kitchen, the debate between gas and electric stoves is a common one. Both have their merits, and the decision often comes down to factors like cooking style, cost, energy efficiency, and personal preferences. In this article, we’ll break down the differences between gas and electric stoves to help you make the best choice for your home.

Which is Better for Your Home?

Cooking Performance

  • Gas Stoves
    Gas stoves are often favored by professional chefs and serious home cooks due to their precise temperature control. The flame is instantly adjustable, offering immediate changes in heat output. This makes gas stoves ideal for tasks like searing, sautéing, and stir-frying, where quick temperature changes are crucial. Additionally, the open flame allows for more even heat distribution across the bottom of the pan, making gas stoves great for a wide range of cooking techniques.
  • Electric Stoves
    Electric stoves, particularly those with smooth ceramic or glass tops, provide even heating and are great for low-and-slow cooking methods like simmering or braising. However, they tend to be slower in both heating up and cooling down, which can be a disadvantage when you need quick adjustments. Electric coil stoves, though less common today, still offer reliable heat, but they are generally less responsive compared to gas burners.

Energy Efficiency and Cost

  • Gas Stoves
    In terms of energy efficiency, gas stoves generally use natural gas or propane, which is often cheaper than electricity in many regions. Gas is an efficient energy source, but some heat is lost because the flame heats the air around the pan. This can make gas stoves slightly less energy-efficient than electric options when it comes to direct heat transfer.
  • Electric Stoves
    Electric stoves, particularly those with induction technology, are highly energy-efficient. Induction stoves, which use electromagnetic fields to heat pots and pans directly, lose very little heat to the surrounding air, making them the most energy-efficient choice. Conventional electric stoves with radiant coils or glass-ceramic tops, however, are slightly less efficient compared to induction but still tend to be more efficient than gas.

Cost of Installation and Operation

  • Gas Stoves
    Gas stoves often have a higher upfront cost, especially if your home doesn’t already have a gas line. Installing a new gas line can be expensive, making the initial investment higher. However, gas is often cheaper to run in the long term, especially if you live in an area where natural gas is less expensive than electricity.
  • Electric Stoves
    Electric stoves are generally easier and cheaper to install, as most homes are already wired for electric appliances. While electric stoves may cost slightly more to operate depending on local electricity rates, their lower initial installation cost can make them more affordable upfront.

Safety Considerations

  • Gas Stoves
    Gas stoves pose certain safety risks, such as gas leaks or the possibility of an open flame causing a fire. Proper ventilation is crucial when using a gas stove to avoid the buildup of harmful fumes, such as carbon monoxide. Newer models come equipped with safety features like automatic shut-off valves to mitigate these risks.
  • Electric Stoves
    Electric stoves eliminate the risk of gas leaks and open flames, making them generally safer. However, the surface of an electric stove can remain hot for a while after cooking, posing a burn risk. Induction stoves, though, cool down quickly since the heat is generated only in the cookware.

Maintenance and Durability

  • Gas Stoves
    Gas stoves typically require more cleaning due to the open flame, which can lead to food and grease buildup on the burners and surrounding surfaces. However, they tend to be more durable, with fewer electronic components that can malfunction. Burner grates and other parts are also easy to replace.
  • Electric Stoves
    Electric stoves, particularly those with smooth tops, are easier to clean, as there are no grates or burners to scrub. However, the glass or ceramic surface can be prone to scratches or cracks if mishandled. Induction stoves also require specific cookware that is compatible with the magnetic heating process.

Environmental Impact

  • Gas Stoves
    Burning natural gas releases carbon dioxide, a greenhouse gas. While natural gas is cleaner than other fossil fuels, it still contributes to carbon emissions. However, some may argue that the overall environmental impact is less than that of electricity, especially if the electricity is sourced from non-renewable power plants.
  • Electric Stoves
    Electric stoves, particularly those using induction, are more environmentally friendly if the electricity used comes from renewable sources like wind or solar. As countries transition to greener energy grids, the carbon footprint of electric stoves may continue to decrease.


FAQs

Which stove is more energy-efficient: gas or electric?

Electric stoves, particularly induction models, tend to be more energy-efficient than gas stoves. Induction stoves use electromagnetic technology to heat cookware directly, losing very little energy to the surrounding air. Conventional electric stoves are also more efficient than gas because they convert electricity directly into heat. Gas stoves, while powerful, lose some energy as heat escapes into the air around the flame.

Are gas stoves more expensive to install than electric stoves?

Yes, gas stoves can be more expensive to install, especially if your home does not already have a gas line. Installing a new gas line and proper ventilation can increase the initial setup cost. Electric stoves, on the other hand, are generally easier and cheaper to install, as most homes are pre-wired for electric appliances.

Which stove type is better for safety: gas or electric?

Electric stoves are generally considered safer than gas stoves because they eliminate the risk of gas leaks and open flames. However, electric stoves can pose burn risks, as their surfaces may remain hot after cooking. Induction stoves offer the safest option, as they cool quickly once the cookware is removed. Gas stoves require proper ventilation and careful handling of the open flame to avoid accidents.


Conclusion

Ultimately, the choice between a gas and electric stove depends on your personal preferences, cooking habits, and the infrastructure of your home. If you value precise heat control and prefer a more hands-on cooking experience, a gas stove might be the best option for you. However, if you prioritize energy efficiency, ease of cleaning, and safety, an electric stove—especially an induction model—could be a better fit.

For those who are conscious about environmental impact, the choice also depends on how your local energy is sourced. If you have access to clean electricity, an electric stove is likely the greener option. However, if natural gas is abundant and affordable in your area, a gas stove may still be a practical choice.

By weighing the pros and cons of each type, you can make an informed decision that suits your cooking style, budget, and home setup.

Smart Thermostats: How They Save You Money

Smart Thermostats How They Save You Money

A smart thermostat is an advanced device that automates temperature control in your home, making it more energy-efficient, convenient, and cost-effective. Unlike traditional thermostats, smart thermostats can learn your habits, adjust temperatures based on real-time conditions, and be controlled remotely via a smartphone. Here’s how they save you money.

How They Save You Money

Learning and Adaptive Schedules

Smart thermostats can learn your daily routines, such as when you wake up, leave for work, and go to bed. By adjusting heating and cooling according to these patterns, they avoid unnecessary energy use, minimizing costs. For example, they can lower the temperature when you’re asleep or away and warm the house just before you return. Over time, this reduces heating and cooling cycles, which directly impacts your utility bills.

Energy Usage Insights

Many smart thermostats provide detailed reports on energy usage, showing how much heating or cooling has been used and identifying ways to save more energy. These insights help you understand peak usage times and allow you to make adjustments, such as setting temperature limits during expensive energy times or choosing energy-saving modes.

Remote Control and Automation

One of the biggest perks is the ability to control the thermostat remotely via a smartphone or tablet. If you forget to adjust the thermostat before leaving the house, you can reduce the temperature on the go, preventing unnecessary heating or cooling. Some models can even use GPS data to detect when you’re close to home, adjusting the temperature accordingly to save energy.

Integration with Smart Home Ecosystems

Smart thermostats often integrate with other smart home devices, like motion sensors or weather forecasts. This allows them to fine-tune the heating or cooling based on real-time factors, such as room occupancy or outdoor temperature. For example, when it detects a cold front approaching, the thermostat can preheat your home efficiently without needing you to adjust it manually.

Energy-Saving Modes

Most smart thermostats have an “eco” mode, which automatically selects an energy-saving temperature when you’re away. These modes ensure that the HVAC system runs less frequently, reducing overall energy consumption.

Rebates and Incentives

Many utility companies offer rebates or incentives for upgrading to smart thermostats because they help reduce peak energy demand. By taking advantage of these programs, you can save even more money on the initial purchase cost.


Frequently Asked Questions (FAQ)

How does a smart thermostat save money compared to a regular thermostat?

A smart thermostat saves money by learning your schedule and automatically adjusting the temperature to reduce heating and cooling when you’re not home or when you’re asleep. It can also provide energy usage insights, helping you optimize your settings. Additionally, remote control via smartphone allows you to adjust temperatures on the go, ensuring you’re not using energy unnecessarily.

Can smart thermostats lower my energy bill even if I’m home most of the day?

Yes, even if you’re home frequently, a smart thermostat can still help you save by optimizing the temperature throughout the day. It can lower the temperature when you’re in rooms you don’t frequently use or adjust the heating/cooling based on real-time weather conditions. Energy-saving modes can also prevent the HVAC system from overworking.

How much can I expect to save with a smart thermostat?

The savings vary based on factors like climate, energy rates, and how often you adjust your settings. However, most users report saving between 10-15% on heating and cooling bills annually. Some smart thermostats also offer features like usage reports, which help identify further areas for saving energy and money.


Conclusion

Investing in a smart thermostat can lead to significant savings by reducing energy usage and cutting down on utility bills. Through learning capabilities, remote control, energy insights, and integration with smart home systems, these devices make your home more efficient and environmentally friendly, all while saving you money year after year.


Seasonal Shed Makeover: Organizing Your Summer Items for Fall Storage

Seasonal shed makeover before and after

As summer fades and autumn approaches, it’s the perfect time to tackle the chaos in your backyard shed. Seasonal transitions can be overwhelming, especially when storing your summer gear efficiently. This blog post will guide you through a practical makeover process, helping you organize your summer items for fall storage. You can reclaim your shed space with a few simple steps and prepare for the cozy months ahead. Let’s dive in and transform your cluttered shed into a well-organized haven!Continue reading →

The Ultimate Guide to Setting Up a Home Theater System

The Ultimate Guide to Setting Up a Home Theater System

Creating a home theater system can transform your living space into an entertainment hub, allowing you to enjoy movies, TV shows, and gaming in the comfort of your own home. However, setting up a home theater can seem daunting, especially with the variety of components available and the different configurations to consider. This guide will walk you through everything you need to know about setting up a home theater system that fits your space, budget, and entertainment needs.

Step 1: Planning Your Home Theater Space

Choosing the Right Room

Before you start purchasing components, consider the following factors in selecting the ideal room for your home theater:

  • Size: A larger room allows for a bigger screen and more seating, while smaller spaces may benefit from a more compact setup.
  • Lighting: Choose a room that can be darkened for optimal viewing. Consider blackout curtains or shades to control ambient light.
  • Acoustics: Rooms with carpeted floors and soft furnishings can help absorb sound, improving the audio experience. Avoid overly echoey or hard-surfaced rooms.

Determining Your Layout

Plan the layout of your home theater based on available space and seating arrangements. Here are some tips:

  • Screen Placement: Ideally, the screen should be at eye level when seated. Consider the distance from the seating area to the screen—approximately 1.5 to 2.5 times the diagonal size of the screen is recommended for optimal viewing.
  • Seating Arrangement: Position seating to provide clear sightlines to the screen. Consider using tiered seating for larger spaces to ensure everyone has a good view.

Step 2: Selecting Your Components

A well-rounded home theater system typically includes the following components:

1. Display

  • Television vs. Projector: Decide whether you want a large TV or a projector and screen setup. TVs offer ease of use and convenience, while projectors can create a cinematic experience.
  • Screen Size: For TVs, consider at least a 55-inch screen for a home theater experience. For projectors, choose a screen size based on your room size and viewing distance.

2. Audio System

  • Soundbar: An easy option that enhances TV sound without complex setups. Look for models with surround sound capabilities.
  • Home Theater Receiver: If you want a more immersive experience, invest in a surround sound receiver. This will allow you to connect multiple audio sources and speakers.
  • Speakers: A typical surround sound setup includes five speakers (front left, front right, center, surround left, surround right) and a subwoofer. Consider wireless options for easier placement.

3. Source Devices

  • Streaming Devices: Consider devices like Roku, Amazon Fire TV, or Apple TV for access to streaming services.
  • Blu-ray Player: A Blu-ray player offers high-quality video playback and can also be used for streaming.
  • Gaming Consoles: If you plan to game in your home theater, ensure your system supports the console of your choice.

4. Cables and Accessories

  • HDMI Cables: Use high-speed HDMI cables to connect devices to the receiver and display for the best quality.
  • Speaker Wire: Ensure you have enough speaker wire to connect your audio components. Use quality wire for optimal sound performance.
  • Surge Protector: Protect your equipment from power surges with a surge protector or power conditioner.

Step 3: Setting Up Your Equipment

1. Installing the Display

  • Wall Mounting vs. Stand: Decide whether to mount the display on the wall or use a stand. If wall mounting, ensure the mount is rated for the weight of your TV or projector.
  • Positioning: Position the display at eye level and adjust for optimal viewing angles. For projectors, set up the projector at the appropriate distance from the screen based on the model’s specifications.

2. Connecting the Audio System

  • Receiver Setup: Connect all source devices to the home theater receiver. Ensure you label each connection for easy reference.
  • Speaker Placement: Position the speakers based on the layout of your room. Follow guidelines for surround sound speaker placement to create an immersive experience.
  • Calibrating Audio: Most receivers come with an auto-calibration feature to optimize speaker settings based on room acoustics. Run this calibration after setup.

3. Configuring Source Devices

  • Setting Up Streaming Devices: Follow the manufacturer’s instructions to connect your streaming devices to your network and configure them for use.
  • Updating Firmware: Make sure all devices are updated to the latest firmware for optimal performance and access to new features.

Step 4: Optimizing Your Home Theater Experience

1. Lighting Control

  • Ambient Lighting: Install dimmable lighting or use smart bulbs that can adjust brightness based on the time of day. Consider adding LED strips behind the screen for backlighting.
  • Blackout Curtains: Use blackout curtains to control light when watching movies during the day.

2. Acoustic Treatment

  • Soundproofing: Consider adding acoustic panels or soundproofing materials to improve sound quality and reduce echoes.
  • Rugs and Curtains: Incorporate rugs, curtains, and furniture to absorb sound and improve overall acoustics.

3. Universal Remote

Invest in a universal remote control that can manage all your devices. This simplifies operation, allowing you to switch between devices without needing multiple remotes.

Step 5: Maintenance and Upgrades

1. Regular Maintenance

  • Dust and Clean: Keep your equipment clean and dust-free. Regularly check connections and wires for wear and tear.
  • Firmware Updates: Check for firmware updates for your devices periodically to ensure optimal performance.

2. Upgrading Components

As technology evolves, consider upgrading components to keep your home theater system current. Look for advancements in audio and video formats, such as 4K and HDR capabilities, to enhance your viewing experience.

FAQs

What is the ideal size for a home theater screen?
The ideal size for a home theater screen depends on your room size and viewing distance. Generally, for a comfortable viewing experience, the screen size should be about 1.5 to 2.5 times the diagonal size of the screen from the seating area. A minimum of 55 inches is recommended for TVs, while projectors can be larger depending on the space.

Do I need a separate audio system for my home theater?
While many modern TVs come with decent built-in speakers, a separate audio system, like a surround sound setup or a soundbar, can significantly enhance your audio experience. For a true cinematic experience, consider investing in a home theater receiver and multiple speakers for immersive sound.

How can I improve the acoustics in my home theater?
To improve acoustics, consider adding soft furnishings like rugs, curtains, and upholstered furniture, which can absorb sound. Acoustic panels can also help reduce echoes and enhance sound quality. Additionally, avoiding hard surfaces and minimizing clutter can contribute to better acoustics in the room.

Conclusion

Setting up a home theater system can be a rewarding project that greatly enhances your entertainment experience. By planning your space, selecting the right components, and optimizing your setup, you can create a stunning home theater that rivals commercial cinemas. With the right knowledge and attention to detail, you’ll enjoy countless hours of entertainment in the comfort of your own home.

Front-Load vs. Top-Load Washing Machines: Which is Better?

Front-Load vs. Top-Load Washing Machines: Which is Better?

When it comes to choosing a washing machine, one of the most significant decisions you’ll face is whether to opt for a front-load or top-load model. Each type has its advantages and disadvantages, and the best choice for you will depend on your specific needs, preferences, and laundry habits. This article will explore the differences between front-load and top-load washing machines to help you make an informed decision.

Front-Load Washing Machines

Design and Operation
Front-load washing machines feature a door on the front, allowing you to load and unload clothes from the front. These machines use a horizontal drum that rotates on a horizontal axis, which helps to tumble the clothes gently and efficiently.

Benefits

Energy and Water Efficiency: Front-load washers typically use less water and energy compared to top-load models. They require less water to fill the drum and often have faster spin cycles, which reduces drying time.
Better Cleaning Performance: The tumbling action of front-load machines can provide a more thorough clean, as clothes are lifted and dropped repeatedly during the wash cycle.
Space-Saving Design: Front-load washers can be stacked with a dryer, making them a great option for small spaces.
Gentler on Clothes: The design and washing action are usually gentler on fabrics, reducing wear and tear.

Drawbacks

Higher Initial Cost: Front-load washers tend to be more expensive than top-loaders, both in terms of purchase price and potential repair costs.
Longer Wash Cycles: Front-load machines typically have longer wash cycles compared to top-load models, which might be inconvenient if you need to do laundry quickly.
Mold and Mildew Issues: If not properly maintained, the rubber gasket around the door can trap moisture and develop mold or mildew.

Top-Load Washing Machines

Design and Operation
Top-load washing machines have a lid on the top, allowing you to load and unload clothes from above. They generally use a vertical drum that agitates clothes during the wash cycle.

Benefits

Faster Wash Cycles: Top-load machines usually have shorter wash cycles, making them convenient for quick laundry days.
Easier Loading and Unloading: Loading clothes from the top can be easier for people with mobility issues or for those who prefer not to bend down.
Lower Initial Cost: Top-load washers are generally less expensive to purchase and repair compared to front-load models.

Drawbacks

Less Energy and Water Efficient: Top-load washers tend to use more water and energy. They require enough water to fully submerge the clothes, which can lead to higher utility bills.
More Wear on Clothes: The agitating action of top-load machines can be harsher on fabrics, leading to more wear and tear over time.
Space Requirements: Top-loaders require more vertical space, which can be a disadvantage in smaller laundry rooms or apartments.

Comparison: Key Factors to Consider

Cleaning Performance
Front-load washers generally provide better cleaning performance due to their tumbling action. They are effective at removing tough stains and dirt, making them ideal for families or those who frequently wash heavily soiled clothes.

Energy and Water Efficiency
If you’re looking to save on utility bills, front-load machines are the better choice. They typically use less water and energy, contributing to lower operating costs.

Maintenance and Durability
Front-load machines may require more maintenance to prevent mold and mildew buildup. However, they often last longer due to their more efficient designs. Top-load machines are usually more straightforward and less costly to repair.

Price
If you’re on a budget, top-load washers are typically more affordable upfront. However, consider the long-term savings associated with energy-efficient front-load machines.

Space Considerations
If space is an issue, front-load machines can be stacked, saving valuable floor space. If you have ample space and prefer easy access, a top-load washer might be more convenient.

FAQs

Which washing machine type is more energy-efficient?
Front-load washing machines are generally more energy-efficient than top-load models. They use less water and energy due to their design and faster spin cycles, which can lead to lower utility bills.

Are front-load washers harder to maintain?
Front-load washers may require more maintenance, particularly to prevent mold and mildew buildup around the rubber gasket. Regular cleaning and leaving the door open after use can help mitigate these issues.

Can I stack a top-load washing machine with a dryer?
No, top-load washing machines cannot be stacked with dryers due to their design, which requires access from the top. However, front-load machines can be stacked, making them a better option for saving space in smaller laundry areas.

Conclusion

Ultimately, the choice between front-load and top-load washing machines depends on your individual needs, preferences, and laundry habits. Front-load washers excel in energy efficiency and cleaning performance but may require more maintenance. Top-load washers are easier to load and generally have shorter wash cycles, but they may use more water and energy. Consider your priorities, budget, and available space when making your decision to find the washing machine that best suits your lifestyle.

How to Maintain Your Washing Machine for Longevity

How to Maintain Your Washing Machine for Longevity

Washing machines are essential appliances in most households, making laundry tasks easier and more efficient. However, like any other machine, they require regular maintenance to ensure optimal performance and extend their lifespan. Proper care can prevent costly repairs and keep your washing machine running smoothly for years. In this article, we will explore essential tips on how to maintain your washing machine for longevity.

Clean the Washing Machine Regularly

Over time, dirt, detergent residue, and fabric softener can build up inside your washing machine, leading to unpleasant odors and reduced efficiency. To prevent this, it’s essential to clean your machine regularly.

Run a Cleaning Cycle: Most modern washing machines have a cleaning cycle specifically designed to remove residue. Use a washing machine cleaner or a mixture of white vinegar and baking soda to clean the drum. Run the machine on the hottest setting to dissolve any build-up.
Wipe Down Seals and Gaskets: The rubber seals around the door can trap moisture and dirt, leading to mold and mildew. After each wash, wipe down the seals and leave the door open to allow the interior to dry out.
Clean the Detergent Dispenser: Detergent and fabric softener can accumulate in the dispenser drawer, leading to clogs and reduced effectiveness. Remove the dispenser drawer and wash it with warm, soapy water. Make sure to clean all the nooks and crannies.

Check and Clean the Filter

The filter in your washing machine is designed to catch lint, debris, and small objects that may have been left in pockets. A clogged filter can cause drainage issues and strain the pump, leading to potential damage.

Locate the Filter: The filter is usually located at the bottom front of the washing machine. Consult your user manual to find its exact location.
Clean the Filter Regularly: Depending on your usage, clean the filter every few weeks. To do this, open the filter cover, remove any debris, and rinse the filter under running water. Be sure to place a towel or shallow container under the filter to catch any water that may spill out.

Use the Right Amount of Detergent

Using too much detergent can lead to excessive suds, which can strain the washing machine’s motor and lead to residue build-up inside the drum and hoses. This can reduce the efficiency of your machine and even cause mechanical issues over time.

Follow Manufacturer Recommendations: Always use the amount of detergent recommended by the manufacturer. High-efficiency (HE) washing machines require low-sudsing detergents, so make sure to use the appropriate type if you have an HE machine.
Adjust for Load Size: The amount of detergent should be adjusted based on the size of the load. For smaller loads, use less detergent to avoid over-sudsing.

Balance the Load

An unbalanced load can cause your washing machine to vibrate excessively during the spin cycle. This not only creates noise but can also damage the machine over time.

Distribute Laundry Evenly: When loading your washing machine, distribute clothes evenly around the drum. Avoid washing heavy items like towels and blankets together, as they can clump on one side and create an unbalanced load.
Use the Correct Load Size: Avoid overloading the machine, as this can put a strain on the motor and reduce washing efficiency. Similarly, washing very small loads can cause the machine to become unbalanced during the spin cycle.

Inspect and Replace Hoses

The hoses connected to your washing machine are responsible for supplying water and draining it after each cycle. Over time, these hoses can become worn, cracked, or clogged, leading to leaks and potential water damage.

Check Hoses Regularly: Inspect the hoses for any signs of wear, such as cracks, bulges, or leaks. If you notice any issues, replace the hoses immediately.
Replace Hoses Every 3-5 Years: Even if your hoses appear to be in good condition, it’s recommended to replace them every 3-5 years as a preventative measure. Consider using stainless steel braided hoses, which are more durable and less likely to burst.

Level the Washing Machine

A washing machine that is not level can cause excessive vibrations, noise, and uneven wear on internal components. This can lead to mechanical issues and reduce the lifespan of your machine.

Use a Level: Place a level on top of your washing machine to check if it is perfectly horizontal. If not, adjust the legs of the machine until it is level.
Tighten the Locking Nuts: Once the washing machine is level, tighten the locking nuts on the legs to prevent them from shifting during operation.

Avoid Overloading the Machine

Overloading your washing machine can strain the motor, reduce cleaning efficiency, and cause mechanical problems over time.

Follow the Manufacturer’s Guidelines: Every washing machine has a recommended load capacity, which is usually indicated in the user manual. Adhere to these guidelines to avoid overloading the machine.
Load the Machine Properly: Place items loosely in the drum and avoid packing them tightly. This allows water and detergent to circulate freely, ensuring a thorough clean.

Run Regular Maintenance Checks

In addition to routine cleaning, it’s important to perform regular maintenance checks to identify and address any potential issues before they become major problems.

Listen for Unusual Noises: Pay attention to any unusual noises during the wash cycle, as these could indicate mechanical problems. If you hear rattling, grinding, or banging, it may be time to call a technician for inspection.
Check for Leaks: Regularly inspect the area around your washing machine for any signs of water leakage. Leaks can lead to water damage and may indicate a problem with the hoses, pump, or seals.

Use the Machine’s Built-In Maintenance Features

Many modern washing machines come with built-in maintenance features designed to help you keep the machine in good condition.

Self-Cleaning Cycle: If your washing machine has a self-cleaning cycle, use it periodically to keep the drum and internal components clean.
Water Hardness Adjustment: Some machines allow you to adjust the settings based on the hardness of your water. This can help prevent limescale build-up and extend the life of your machine.

FAQs

How often should I clean my washing machine?

It’s recommended to clean your washing machine once a month. This includes running a cleaning cycle, wiping down the seals and gaskets, and cleaning the detergent dispenser to prevent residue build-up and odors.

What should I do if my washing machine is making unusual noises?

Unusual noises like rattling, grinding, or banging may indicate a mechanical issue. Stop the machine, check for an unbalanced load or foreign objects in the drum, and if the noise persists, consult a technician.

How do I prevent my washing machine from developing mold or mildew?

To prevent mold and mildew, leave the washing machine door open after each use to allow the interior to dry out. Additionally, regularly wipe down the seals and run a cleaning cycle with a mixture of white vinegar and baking soda.

Conclusion

Maintaining your washing machine is essential for ensuring its longevity and optimal performance. By following the tips outlined in this article—such as regular cleaning, balancing loads, inspecting hoses, and avoiding overloading—you can prevent common issues and extend the lifespan of your appliance. Regular maintenance not only saves you money on repairs but also ensures that your washing machine continues to provide efficient and effective cleaning for years to come.