

A good night’s sleep starts with a clean bed. Most people wash their sheets regularly, but they forget about what lies beneath — the mattress itself. Over time, mattresses collect dust mites, dead skin cells, sweat, pet dander, and allergens. These invisible guests can affect your sleep quality and your health.
The good news is that a specialized vacuum cleaner can tackle all of this effectively. However, knowing how to use it correctly makes all the difference. This article walks you through everything you need to know about keeping your bed fresh, hygienic, and comfortable.
Why Your Mattress Needs More Than Just Clean Sheets
Sheets protect your mattress to some degree. But they are not a barrier against everything. Every night, your body sheds thousands of skin cells. Sweat seeps through fabric. Dust mites thrive in warm, humid environments — and your mattress is the perfect habitat for them.
Studies suggest that an average mattress can harbor millions of dust mites after just a few years of use. These tiny creatures feed on dead skin and produce waste that triggers allergies and asthma in many people. Therefore, simply changing sheets is not enough.
A specialized vacuum cleaner goes deeper. It reaches into the surface layers of your mattress and pulls out what a regular cloth wipe or sheet change cannot. When you make it part of your home cleaning routine, you create a sleeping environment that is genuinely cleaner — not just visually clean.
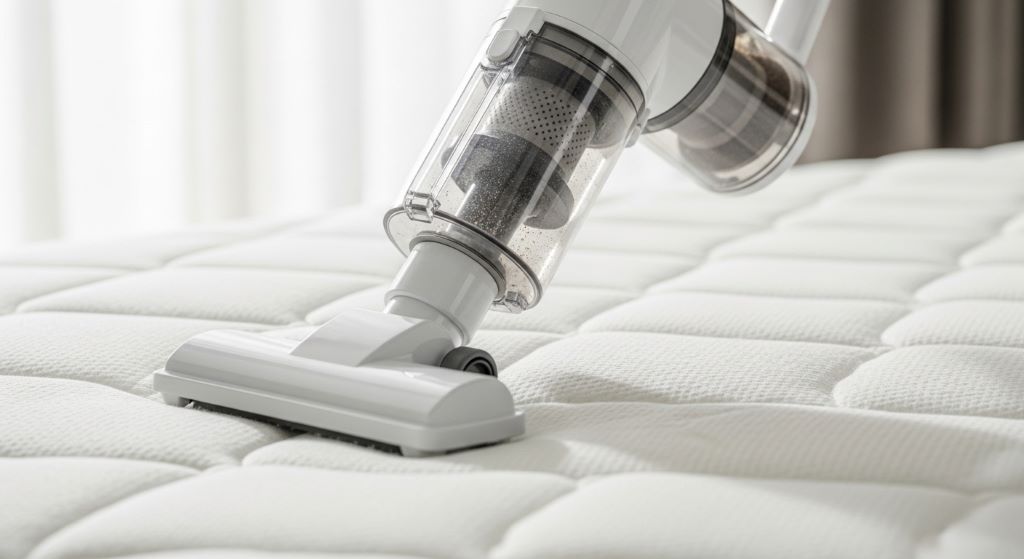
What Makes a Specialized Mattress Vacuum Different
Not all vacuums are made equal. A standard household vacuum can pick up visible debris, but it often lacks the suction, filtration, and design needed for mattress care.
Specialized mattress vacuums are built differently. They typically include:
- A HEPA filter that traps fine particles like dust mite waste and pollen
- A pulsating or vibrating head that loosens embedded debris before suction
- UV-C light technology that kills bacteria, dust mites, and other microorganisms
- A compact, flat design that makes it easy to maneuver across mattress surfaces
These features work together to clean at a level that regular vacuums simply cannot reach. Additionally, the UV-C light function is particularly valuable because it targets what you cannot see — the microscopic organisms living inside your mattress.
How Often Should You Vacuum Your Mattress
Frequency matters. Vacuuming your mattress once in a while is better than never. But for real results, consistency is key.
For most households, vacuuming the mattress every two weeks is a solid target. If you have pets that sleep on the bed, have allergies, or live in a humid climate, you may want to do it weekly.
Additionally, certain moments call for an extra clean. After an illness, after a pet accident, or when you notice unusual smells, go ahead and vacuum even if it is not your scheduled time. Incorporating this into a broader home cleaning routine ensures your bed stays fresh between deeper cleans.
Step-by-Step Guide to Vacuuming Your Mattress
Getting the most out of your mattress vacuum requires a proper technique. Rushing through the process leaves debris behind. Here is a clear, step-by-step approach that works.
Remove All Bedding First
Start by stripping the bed completely. Take off the pillowcases, sheets, mattress protector, and any blankets. Wash these in hot water to kill dust mites and bacteria while you work on the mattress.
A clean surface gives your vacuum direct access to the mattress. It also prevents clean bedding from picking up loosened dust when you put it back on.
Let the Mattress Air Out
Before you vacuum, give the mattress ten to fifteen minutes to air out. Open a window if possible. Fresh air helps moisture escape from the surface, which makes suction more effective. A damp surface can cause dust and debris to cling together rather than lift away.
Vacuum in Slow, Overlapping Passes
Begin at the top of the mattress and work your way down in slow, overlapping strokes. Do not rush. The slower you move, the more time the vacuum has to pull debris from deeper layers.
Pay extra attention to seams and edges. These areas trap the most dust and skin cells. Use a crevice tool or attachment if your vacuum comes with one. Most specialized mattress vacuums include accessories designed specifically for this.
Use the UV-C Function
If your vacuum has a UV-C light, activate it during your pass. This feature sanitizes mattress surfaces as you vacuum. It is one of the most effective ways to sanitize mattress areas that are difficult to treat with sprays or covers alone.
Move at a steady, slow pace to give the UV-C light enough contact time to work. Rushing reduces its effectiveness significantly.
Flip and Repeat
After cleaning one side, flip the mattress if it is a double-sided model. Repeat the same process on the other side. Single-sided mattresses still benefit from vacuuming the edges and underside occasionally to prevent dust buildup.
Dealing With Stains Before You Vacuum
Vacuuming handles dry debris well. Stains, however, need a different approach. Always treat stains before vacuuming, not after.
For most stains, a mixture of cold water and a mild detergent works well. Apply it with a clean cloth, blotting gently rather than rubbing. Rubbing spreads the stain and pushes it deeper into the fabric.
Enzyme-based cleaners are excellent for biological stains like sweat or urine. They break down the organic matter at a molecular level, which eliminates both the stain and the odor.
After treating a stain, allow the area to dry completely before vacuuming. Vacuuming a damp area can clog your machine and reduce its efficiency.
Using Baking Soda to Boost Freshness
Baking soda is a simple and effective deodorizer. It absorbs moisture and neutralizes odors naturally. Adding this step to your routine makes a noticeable difference in how fresh your mattress smells.
Sprinkle a light layer of baking soda across the entire surface of the mattress. Let it sit for at least thirty minutes. For stronger odors, leave it for a few hours or even overnight.
Afterward, vacuum up all the baking soda thoroughly. Make sure none is left behind, as residue can attract moisture over time. This step pairs perfectly with your specialized vacuum session and requires no extra tools.
Protecting Your Mattress Between Cleanings
Vacuuming regularly is important. However, good protection makes each cleaning more effective and extends the time between deep cleans.
A high-quality mattress protector is one of the best investments you can make. It acts as a barrier against sweat, spills, and dust mites. Look for one that is waterproof and machine washable. Wash it every two weeks alongside your sheets.
Additionally, consider using pillow protectors. Pillows accumulate just as much dust and bacteria as mattresses. A washable cover adds a simple layer of defense.
Keeping pets off the bed reduces the amount of dander and debris on your mattress. If that is not realistic, vacuum more frequently and wash your bedding in hotter water.
Signs That Your Mattress Needs Extra Attention
Even with a regular home cleaning routine, some situations call for a more thorough approach. Here are signs that your mattress needs extra care:
- You wake up with a stuffy nose or itchy eyes regularly
- There is a musty or stale smell even after washing the sheets
- You can see visible stains, dark spots, or discoloration
- Someone in the household has recently been ill
- Your pet has had an accident on the bed
When you notice any of these signs, do not just vacuum. Combine vacuuming with a baking soda treatment, stain removal, and ideally an airing session in sunlight. Sunlight is a natural disinfectant and one of the simplest ways to sanitize mattress surfaces without any products.
Building Mattress Care Into Your Weekly Routine
Consistency is everything. A one-time deep clean will not keep your bed healthy for long. The real benefit comes from making mattress care a regular habit.
A simple weekly schedule might look like this:
- Every week: wash sheets and pillowcases in hot water
- Every two weeks: vacuum the mattress with a specialized vacuum cleaner
- Every month: apply baking soda and vacuum thoroughly
- Every three months: rotate the mattress and inspect for wear or damage
- Every six months: wash the mattress protector and pillows
Building these steps into your broader home cleaning routine means you never have to think about it too hard. It simply becomes part of how you care for your home.
Choosing the Right Specialized Vacuum for Your Bed
The market offers many options, and the right choice depends on your needs and budget. Here are a few things to look for when shopping.
Suction power is the first consideration. A vacuum with strong suction lifts more debris from the mattress surface. Look for models with at least 8,000 to 10,000 Pa of suction for mattress use.
HEPA filtration is non-negotiable if you have allergies or asthma. A true HEPA filter captures 99.97 percent of particles as small as 0.3 microns. This includes dust mite waste, pollen, and pet dander.
UV-C functionality adds an extra layer of protection. Not all mattress vacuums include it, but those that do offer a significant advantage in reducing bacteria and mite populations.
Weight and size also matter. A lighter, compact model is easier to use across a large mattress. Corded models typically offer more consistent suction, while cordless ones offer more freedom of movement.
Finally, read user reviews carefully. Pay attention to comments about long-term durability and filter replacement costs. A cheap vacuum that breaks after six months is no bargain.
Common Mistakes to Avoid
Many people vacuum their mattress with good intentions but make errors that reduce the results. Here are the most common mistakes and how to avoid them.
Moving too quickly is the most frequent problem. Slow, deliberate passes give the vacuum time to work. Speed reduces suction contact time and leaves debris behind.
Skipping the edges is another common oversight. The seams and sides of a mattress hold a surprising amount of dust. Always include these areas in your cleaning pass.
Using a vacuum without a HEPA filter is counterproductive for allergy sufferers. Without proper filtration, the vacuum may release fine particles back into the air while it runs.
Vacuuming a wet or damp mattress can damage the machine and reduce effectiveness. Always make sure the surface is dry before you begin.
Finally, forgetting to empty the dustbin or replace the filter regularly reduces suction over time. Check and clean your vacuum after every use for best performance.
Conclusion
Keeping your bed clean goes far beyond fresh sheets. A specialized vacuum cleaner is one of the most effective tools for maintaining a truly hygienic sleep environment. It removes the dust mites, allergens, and debris that accumulate deep in your mattress over time.
By vacuuming consistently, treating stains properly, using baking soda for freshness, and protecting your mattress with a quality cover, you create a sleeping space that supports your health and comfort. Making these steps part of your regular home cleaning routine ensures the effort stays manageable and the results stay consistent.
A cleaner bed leads to better sleep. And better sleep leads to a better life. Start small, stay consistent, and your mattress will thank you for years to come.
Frequently Asked Questions
How often should I use a specialized vacuum on my mattress?
For most people, every two weeks is ideal. If you have allergies, pets, or live in a humid environment, vacuuming once a week is a better option.
Can a regular vacuum cleaner replace a specialized mattress vacuum?
A regular vacuum can help with surface debris, but it lacks the HEPA filtration, UV-C light, and pulsating head that a mattress-specific vacuum offers. For allergy sufferers especially, a specialized model is worth the investment.
Is it safe to use UV-C light on a mattress?
Yes, when used as part of a mattress vacuum, UV-C light is safe and effective. Avoid looking directly at the UV-C light during use, and follow the manufacturer’s guidelines.
How long should baking soda sit on a mattress before vacuuming?
At least thirty minutes for light freshening. For stronger odors, leave it for a few hours. Overnight is ideal for the best results.
What is the best way to sanitize mattress surfaces without chemicals?
Sunlight is a natural and chemical-free option. Leave your mattress in direct sunlight for a few hours. Combined with regular vacuuming, this is one of the most effective approaches for natural mattress care.
Related Topics:
The Ultimate Guide to Removing Stubborn Stains from Clothes and Upholstery
Troubleshooting Push Pull Valve with Low Water Pressure